前言
大数据的列表滚动一直是很头疼的问题,尤其无限滚动这种场景,不像人家安卓,有RecyclerView这种内置组件可以用。前端只能可怜巴巴的自己实现,幸好前人栽树,后人乘凉,业界有同行已经写了一些实现,本文将要介绍的便是其中一种。
https://github.com/hdcoo/recycler-view
大概原理
先去这里 ,下载demo源代码,clone下来后npm install,然后访问http://localhost:5211/recycler-view-demo/, 我们要介绍的是经典两列布局的瀑布流,也就是入口是waterfall.js的那个例子。
demo项目运行起来以后,打开控制台发现每个例子的布局都很奇怪。正常情况下我们写一个局部滚动,代码应该是这样的。
可是这个库的布局是这样的
内层元素是以绝对定位+translate的方式“贴”上去的,比起普通的流式布局,这样做的好处是一旦周围的元素有变化(位置变化或者干脆从dom树中删除),主体元素的位置不会变化。我们可以利用这一特性,在页面初始化中只渲染能覆盖一屏的元素个数(假如是15个),在滚动容器的过程中,势必有一些元素滚出屏幕(A),又有新的元素将要出现在屏幕内(B),我们重复利用滚出屏幕的废弃元素(A),改变他们的translate,使其出现在B应该出现的位置,然后改变B的数据。这样即使有成千上万条数据,渲染在容器内的dom也仅仅只有15个(可能大于15,只有B的个数大于A的个数时,才会createElement)。这就是核心所在。
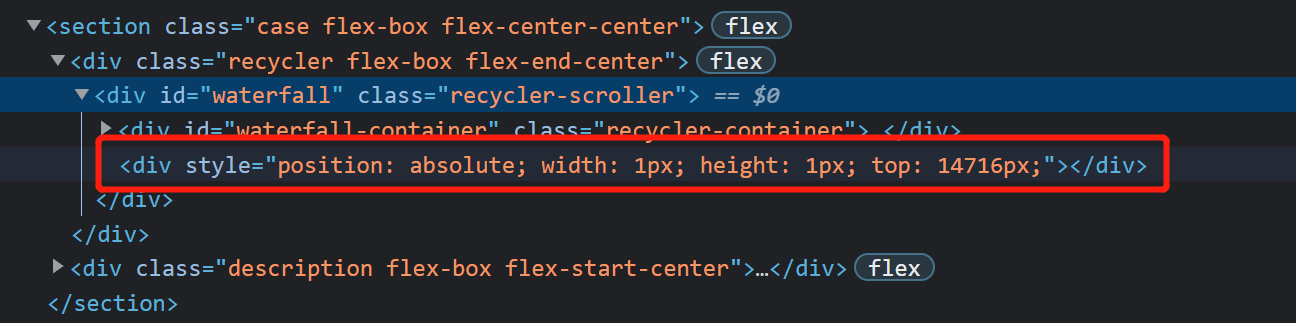
回到官方的两列瀑布流例子

从图中可以看出变化的仅仅是translate,外层recycler-scroller的最大滚动高度很大,随着页面的滚动,可见的元素仅仅是那几个被反复利用的元素,其实recycler-scroller下部有大片看不到的空白,实际高度是由一个宽高都为1的绝对定位元素(sentine)撑开的,这个元素的top便是scroller的最大滚动高度。
为啥有个container,以我的理解,从这个库的原理来看,container的作用仅仅是区分可见元素的dom与sentine,方便管理(比如说往container里面append元素)。
具体的代码实现
整体设计
从dom结构来看,整个库分为三部分:Scroller = Containe + Sentine。
从代码层次来看,整个库分为Recyler、Render与Source。Recyler是核心实现,Render负责dom的创建/更新以及不可见元素的回收利用。Source顾名思义数据之源,由于这个库的原理所限,每项数据必须提供height与scrollTop。
单行代码分析
首先入口文件是waterfail.js
1
2
3
4
5
6
| export default function getWaterfallRecycler(scroller, container) {
return new Recycler(scroller, new WaterfallSource(), {
container,
renderer: new NumberRenderer()
});
}
|
需要一个提供数据与每项数据的位置参数的Source实例,需要一个提供每项元素具体render实现以及回收/释放屏幕外元素的Render实例,需要一个产生滚动的的滚动容器(scroller),以及用于管理屏幕内(准确说应该是当下渲染出的元素)的元素。
接下来看Recycler的具体实现。
1
| class Recycler<T> extends EventEmitter implements IRecycler<T>{}
|
EventEmitter是一个简短的消息发射器,用于向外界通知Recycler的各种情况,比如说是否正在滚动以及是否滚到了底部。
我基于作者的注释给与补充
1
2
3
4
5
6
7
8
9
10
11
12
13
14
15
16
17
18
19
20
21
22
23
24
25
26
27
28
29
30
31
32
33
34
35
36
37
38
39
40
41
42
43
44
45
46
47
48
49
50
51
52
53
54
55
56
57
58
59
60
61
62
63
64
65
66
67
68
69
70
71
72
73
74
75
76
77
78
79
80
81
82
83
84
85
86
87
88
89
90
91
92
93
94
95
96
97
98
| class Recycler<T> extends EventEmitter implements IRecycler<T>{
constructor(scroller: Window | HTMLElement, sources: ISource<T> | Array<ISource<T>>, options: IOptions<T>) {
super();
this.scrollerOperations = new ScrollerOperations(scroller);
if (!this.scrollerOperations.isScrollerValid()) {
throw Exceptions.TypeError('Invalid scroller, must be window or inside document.body');
}
this.scroller = scroller;
this.scrollerHeight = this.scrollerOperations.getOffsetHeight();
this.renderer = options.renderer;
this.container = options.container || this.scrollerOperations.getElement();
this.topPreserved = Math.max(options.topPreserved || 0, 0);
this.bottomPreserved = Math.max(options.bottomPreserved || 0, 0);
this.runwayItems = options.runwayItems || 5;
this.runwayItemsOpposite = options.runwayItemsOpposite || 2;
this.threshold = options.threshold || 5;
this.initRunways(sources);
this.activatedRunway = Recycler.getDefaultRunwayKey(sources);
this.scrollListener = new ScrollListener(this.scroller);
this.resizeListener = new ResizeListener();
this.sentinel = document.createElement('div');
this.sentinel.style.position = 'absolute';
this.sentinel.style.width = '1px';
this.sentinel.style.height = '1px';
this.scrollerOperations.appendChild(this.sentinel);
if (options.enableAcceleration) {
this.transformTemplate = (x, y) => `translate3d(${x}, ${y}px, 0)`;
} else {
this.transformTemplate = (x, y) => `translate(${x}, ${y}px)`;
}
if (window.getComputedStyle(this.container).position === 'static') {
this.container.style.position = 'relative';
}
this.setSentinelPosition();
this.scrollListener.on(this.onScroll.bind(this));
if (options.handleWindowResize) {
this.resizeListener.on(this.onResize.bind(this));
}
mapObject(this.runways, (runway) => {
execute(() => runway.source.mount(this));
});
if (this.getRunway().source.getLength(this) > 0) {
this.update();
}
setTimeout(() => this.emit(Recycler.Events.Initialized, this));
}
}
|
接下来说明constructor中几个重要的步骤。
1
2
| this.initRunways(sources);
this.activatedRunway = Recycler.getDefaultRunwayKey(sources);
|
initRunways调用了addRunway,addRunway调用了getInitialRunway。
1
2
3
4
5
6
7
8
9
10
11
12
13
14
| protected static getInitialRunway<U>(source: ISource<U>): IRunway<U> {
return {
scrollTop: 0,
firstAttachedItem: 0,
lastAttachedItem: 0,
firstScreenItem: 0,
lastScreenItem: 0,
requestInProgress: false,
runwayMaxScrollTop: 0,
nodes: {},
screenNodes: newSet(),
source,
};
}
|
代码很明显,runway就是一个保存了在滚动过程中几个比较重要参数的对象。
scrollTop:scroller的scrollTop
requestInProgress:是否正在请求数据,
nodes:渲染出来的元素集合(不仅仅是屏幕内的元素)
screenNodes:nodes的缓存
runwayMaxScrollTop:scroller的最大滚动高度,即Sentine的top值,可以由source的height计算得出。
至于firstAttachedItem/lastAttachedItem/firstScreenItem/lastScreenItem这两对的意思??为什么是两对,这个后面会解释,这里认为只有一对好了,即firstScreenItem/lastScreenItem,意思是把source中的哪几项渲染到container内。
这样,initRunways的意思是初始化了这样一个对象,至于activatedRunway暂且跳过。
1
2
3
4
5
6
7
| public update(disableRender?: boolean) {
this.scrollerHeight = this.scrollerOperations.getOffsetHeight();
this.getRunway().runwayMaxScrollTop = this.getRunwayMaxScrollTop();
this.setSentinelPosition();
this.emit(Recycler.Events.Update, this, disableRender);
!disableRender && this.onScroll();
}
|
upadte内部首先算出scroller的滚动高度,调用setSentinelPosition,然后手动调用onScroll方法渲染出第一屏元素。所以关键是onScroll的实现。
onScroll
去繁从简,onScroll干的事首先算出在当前滚动中应该被渲染元素的索引(先不考虑具体的实现),然后根据滚动的方向调用fill方法渲染html
fill
1
2
| const fixedStart = Math.max(0, start);
const fixedEnd = Math.min(runway.source.getLength(this) - 1, end);
|
这两句很疑惑,为什么要重新计算start和end呢
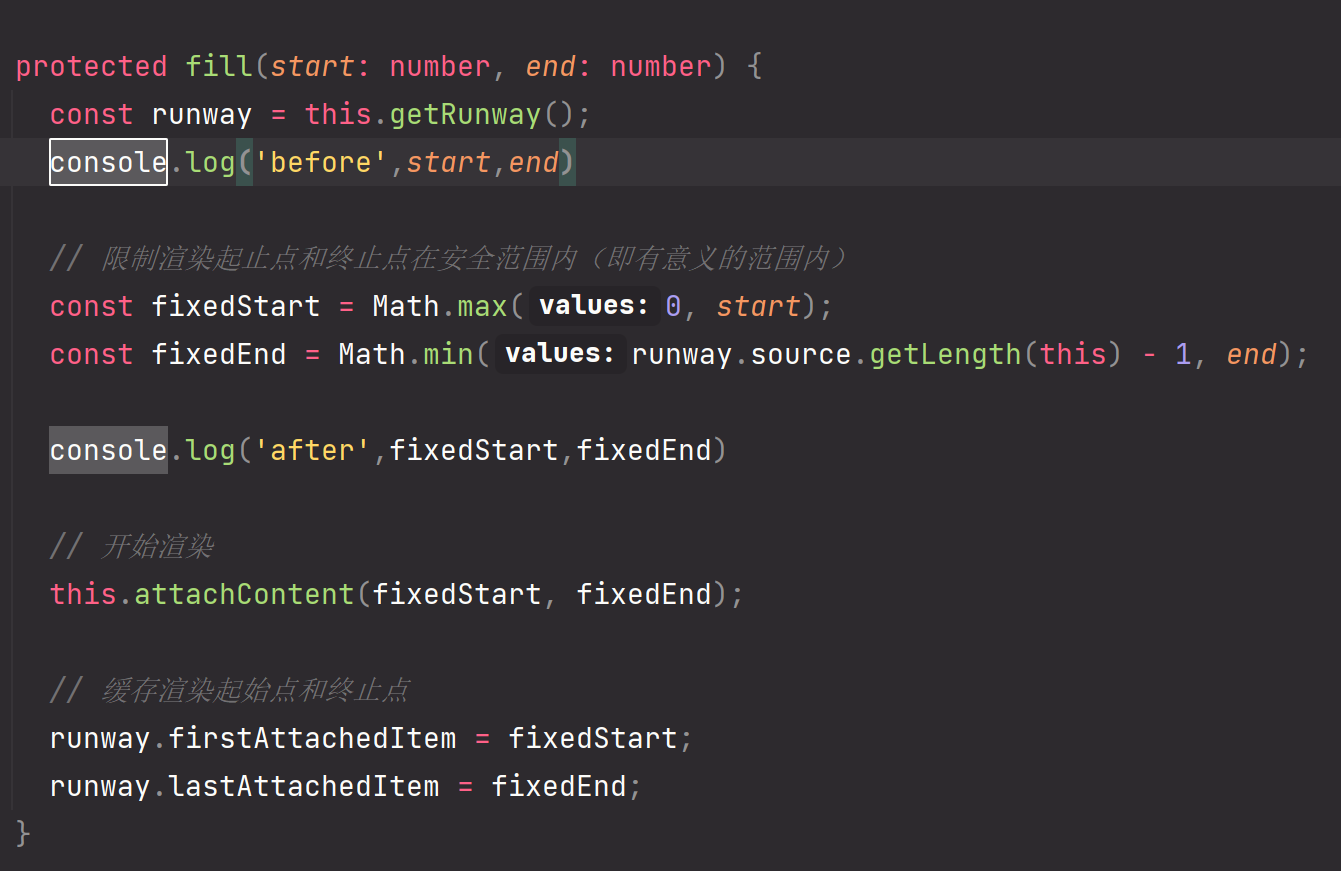

从图中可以看出由于runwayItemsOpposite与runwayItems的存在,算出来的start可能小于0,end可能大于source的最大长度,所以需要重新计算,这就是为什么initRunway方法里面有两对关于start、end的值的原因。
算出正确的start、end后调用了attachContent。
attachContent分两步:
- 根据start、end释放屏幕外的元素。这里有两步,首先更新runway.nodes与runway.screenNodes,screenNodes是nodes的缓存,这俩货只负责渲染container内部的元素,实现dom的重复利用的是renderer.release方法。
1
2
3
4
| public release(el: HTMLElement, recycler: IRecycler<T>): void {
this.queue.using.delete(el);
this.queue.unused.push(el);
}
|
调用release方法时缓存了废弃的元素。
- 渲染当前滚动屏幕内的元素。
1
2
3
4
5
6
7
8
9
10
11
12
13
14
15
16
17
18
19
20
21
22
23
24
25
26
27
28
29
30
31
32
33
34
35
36
37
38
39
40
41
42
43
44
45
46
| protected attachContent(start: number, end: number) {
const runway = this.getRunway();
const benchNodes = [];
const changedNodes: IChangedNodes = [];
this.freeUnusedNodes(start, end, this.isForceUpdate);
for (let i = start; i <= end; i++) {
if (!this.isForceUpdate && runway.nodes[i]) {
continue;
}
const renderer = this.getRenderer(i);
const data = runway.source.getData(i, this);
const node = runway.nodes[i] = renderer.render(data, this);
runway.screenNodes.add(node);
changedNodes.push({node, index: i});
if (node.parentNode !== this.container) {
benchNodes.push(node);
}
}
this.setNodesStyles(changedNodes);
while (benchNodes.length) {
this.container.appendChild(benchNodes.pop());
}
this.maybeLoadMore(end);
}
|
这几行代码算是比较核心的实现。如果runway.nodes[i]存在,则不渲染,即使不存在,会调用renderer.render方法,这个方法会优先从render的缓存中pop一个元素出来,改变它的translate和data从而实现dom的重复利用。
并且为了更高的性能,定义了changedNodes与benchNodes,前者包含当次滚动中需要渲染的所有元素(缓存中的元素+新创建的元素),后者仅仅是新创建的元素,这样仅仅只需要改变前者的transtrate,把后者append到container中就可以了。
这样,整个流程便走完了,后面在scroller滚动过程中会反复调用this.onScroll,思路和上面的一样。
简短的流程
去繁从简,从构造函数开始,整个流程如下:
constructor -> this.update() -> this.onScroll() -> (this.getFirstScreenItem;this.getLastScreenItem,计算出理论上container内渲染元素的start、end索引) -> (this.fill(),计算出实际的start、end索引) -> (this.attachContent(),准备根据start、end更新container内的元素)
把attachContent单拎出来。
this.attachContent() -> (this.freeUnusedNodes(),释放屏幕外的元素,其实是放入render的unused中) -> (渲染屏幕内的元素)
再过滤一遍,核心实现就三步:
- 依据上次的start、end计算本次的start、end (getFirstScreenItem、getLastScreenItem)
- 依据start、end释放屏幕外的元素
- 依据start、end更新屏幕内的元素
1
2
3
4
5
6
7
8
9
10
11
12
13
14
15
16
17
18
19
20
21
22
23
| protected getFirstScreenItem(initialAnchorItem: number, scrollTop: number): number {
let i = initialAnchorItem;
const runway = this.getRunway();
const sourceLastIndex = runway.source.getLength(this) - 1;
if (runway.source.getScrollTop(i, this) + runway.source.getHeight(i, this) < scrollTop) {
while (i < sourceLastIndex && runway.source.getScrollTop(++i, this) + runway.source.getHeight(i, this) <= scrollTop) {
}
} else {
while (i > 0 && runway.source.getScrollTop(--i, this) + runway.source.getHeight(i, this) > scrollTop) {
}
i < sourceLastIndex && i > 0 && ++i;
}
return i;
}
|
1
2
3
4
5
6
7
8
9
10
11
12
13
14
15
16
17
18
19
20
21
22
23
24
| protected getLastScreenItem(initialAnchorItem: number, scrollTop: number): number {
let i = initialAnchorItem;
const runway = this.getRunway();
const sourceLastIndex = runway.source.getLength(this) - 1;
if (runway.source.getScrollTop(i, this) > scrollTop) {
while (i > 0 && runway.source.getScrollTop(--i, this) >= scrollTop) {
}
} else {
while (i < sourceLastIndex && runway.source.getScrollTop(++i, this) < scrollTop) {
}
i > 0 && i < sourceLastIndex && --i;
}
return i;
}
|
1
2
3
4
5
6
7
8
9
10
| protected freeUnusedNodes(start: number, end?: number, force?: boolean) {
const runway = this.getRunway();
if (force || start > runway.lastAttachedItem || end < runway.firstAttachedItem) {
return this.freeNodesFromStart(runway.firstAttachedItem, Math.min(runway.source.getLength(this), runway.lastAttachedItem + 1));
}
this.freeNodesFromStart(runway.firstAttachedItem, start);
this.freeNodesFromEnd(end, runway.lastAttachedItem);
}
|
这个方法比较简单,依次释放屏幕上次边界以外的元素,释放方法就是使用for循环依次放入render的unused中。
最后就是更新屏幕内的元素,更新方法是优先复用render的unused中的元素,仅仅改变他们的translate,不会引起重排,如果item很复杂的话,render.update方法也会消耗性能,但这是外部控制的。如果render.unused中没有元素,则需要createDom(与render.update类似) -> appendDom,除了首次渲染,不会出现高频appendDom的情况。
所以就库本身来说,性能还是挺高的。
最后,由于这个库的特殊布局,它能实现很多种UI效果,普通的多列、甚至复杂的多列瀑布流。不足的地方就是每个item都需要知道height与scrollTop。